微調 Stable Diffusion 模型
作者: Sayak Paul、Chansung Park
建立日期 2022/12/28
上次修改日期 2023/01/13
說明: 使用自訂的圖片-文字描述資料集微調 Stable Diffusion 模型。

簡介
本教學說明如何在 {圖像, 文字描述} 配對的自訂資料集上微調 Stable Diffusion 模型。我們以 Hugging Face 提供的微調腳本為基礎 這裡。
我們假設您對 Stable Diffusion 模型有基本的了解。如果您正在尋找更多相關資訊,以下資源可能會有所幫助
強烈建議您使用至少具有 30GB 記憶體的 GPU 來執行程式碼。
在本指南的最後,您將能夠生成有趣的寶可夢圖像

本教學依賴 KerasCV 0.4.0。此外,我們至少需要 TensorFlow 2.11 才能使用 AdamW 和混合精度。
!pip install keras-cv==0.6.0 -q
!pip install -U tensorflow -q
!pip install keras-core -q
我們要微調什麼?
Stable Diffusion 模型可以分解為幾個關鍵模型
- 一個將輸入提示投影到潛在空間的文字編碼器。(與圖像相關聯的文字描述稱為「提示」。)
- 一個將輸入圖像投影到潛在空間的變分自動編碼器 (VAE),作為圖像向量空間。
- 一個擴散模型,它根據編碼的文字提示,細化一個潛在向量並產生另一個潛在向量
- 一個解碼器,它根據擴散模型的潛在向量產生圖像。
值得注意的是,在從文字提示產生圖像的過程中,通常不使用圖像編碼器。
但是,在微調過程中,工作流程如下所示
- 輸入文字提示由文字編碼器投影到潛在空間。
- 輸入圖像由 VAE 的圖像編碼器部分投影到潛在空間。
- 針對給定的時間步長,向圖像潛在向量添加少量雜訊。
- 擴散模型使用來自這兩個空間的潛在向量以及時間步長嵌入來預測添加到圖像潛在向量中的雜訊。
- 在預測的雜訊和步驟 3 中添加的原始雜訊之間計算重建損失。
- 最後,使用梯度下降針對此損失優化擴散模型參數。
請注意,在微調期間僅更新擴散模型參數,而(預訓練的)文字和圖像編碼器保持凍結狀態。
如果聽起來很複雜,請不要擔心。程式碼比這簡單得多!
匯入
from textwrap import wrap
import os

import keras_cv
import matplotlib.pyplot as plt
import numpy as np
import pandas as pd
import tensorflow as tf
import tensorflow.experimental.numpy as tnp
from keras_cv.models.stable_diffusion.clip_tokenizer import SimpleTokenizer
from keras_cv.models.stable_diffusion.diffusion_model import DiffusionModel
from keras_cv.models.stable_diffusion.image_encoder import ImageEncoder
from keras_cv.models.stable_diffusion.noise_scheduler import NoiseScheduler
from keras_cv.models.stable_diffusion.text_encoder import TextEncoder
from tensorflow import keras
資料載入
我們使用資料集 Pokémon BLIP 字幕。但是,我們將使用與原始資料集略有不同的版本,以便更好地與 tf.data 配合使用。請參閱 文件以了解更多詳細資訊。
data_path = tf.keras.utils.get_file(
    origin="https://huggingface.co/datasets/sayakpaul/pokemon-blip-original-version/resolve/main/pokemon_dataset.tar.gz",
    untar=True,
)

data_frame = pd.read_csv(os.path.join(data_path, "data.csv"))

data_frame["image_path"] = data_frame["image_path"].apply(
    lambda x: os.path.join(data_path, x)
)
data_frame.head()
| image_path | caption | |
|---|---|---|
| 0 | /home/jupyter/.keras/datasets/pokemon_dataset/... | 一隻眼睛是紅色的綠色寶可夢的繪圖 |
| 1 | /home/jupyter/.keras/datasets/pokemon_dataset/... | 一個鼻子是紅色的綠色和黃色玩具 |
| 2 | /home/jupyter/.keras/datasets/pokemon_dataset/... | 一個看起來很生氣的紅白球... |
| 3 | /home/jupyter/.keras/datasets/pokemon_dataset/... | 一個臉上帶著微笑的卡通球 |
| 4 | /home/jupyter/.keras/datasets/pokemon_dataset/... | 一堆臉上畫著圖案的球 |
由於我們只有 833 個 {圖像, 文字描述} 配對,我們可以預先計算文字描述中的文字嵌入。此外,文字編碼器將在微調過程中保持凍結,因此我們可以藉此節省一些計算量。
在使用文字編碼器之前,我們需要將文字描述進行符號化。
# The padding token and maximum prompt length are specific to the text encoder.
# If you're using a different text encoder be sure to change them accordingly.
PADDING_TOKEN = 49407
MAX_PROMPT_LENGTH = 77

# Load the tokenizer.
tokenizer = SimpleTokenizer()

#  Method to tokenize and pad the tokens.
def process_text(caption):
    tokens = tokenizer.encode(caption)
    tokens = tokens + [PADDING_TOKEN] * (MAX_PROMPT_LENGTH - len(tokens))
    return np.array(tokens)


# Collate the tokenized captions into an array.
tokenized_texts = np.empty((len(data_frame), MAX_PROMPT_LENGTH))

all_captions = list(data_frame["caption"].values)
for i, caption in enumerate(all_captions):
    tokenized_texts[i] = process_text(caption)
準備一個 tf.data.Dataset
在本節中,我們將從輸入圖像檔案路徑及其對應的文字描述符號準備 tf.data.Dataset 物件。本節將包括以下內容
- 從符號化的文字描述預先計算文字嵌入。
- 載入和擴增輸入圖像。
- 隨機調整和批次化資料集。
RESOLUTION = 256
AUTO = tf.data.AUTOTUNE
POS_IDS = tf.convert_to_tensor([list(range(MAX_PROMPT_LENGTH))], dtype=tf.int32)

augmenter = keras.Sequential(
    layers=[
        keras_cv.layers.CenterCrop(RESOLUTION, RESOLUTION),
        keras_cv.layers.RandomFlip(),
        tf.keras.layers.Rescaling(scale=1.0 / 127.5, offset=-1),
    ]
)
text_encoder = TextEncoder(MAX_PROMPT_LENGTH)


def process_image(image_path, tokenized_text):
    image = tf.io.read_file(image_path)
    image = tf.io.decode_png(image, 3)
    image = tf.image.resize(image, (RESOLUTION, RESOLUTION))
    return image, tokenized_text


def apply_augmentation(image_batch, token_batch):
    return augmenter(image_batch), token_batch


def run_text_encoder(image_batch, token_batch):
    return (
        image_batch,
        token_batch,
        text_encoder([token_batch, POS_IDS], training=False),
    )


def prepare_dict(image_batch, token_batch, encoded_text_batch):
    return {
        "images": image_batch,
        "tokens": token_batch,
        "encoded_text": encoded_text_batch,
    }


def prepare_dataset(image_paths, tokenized_texts, batch_size=1):
    dataset = tf.data.Dataset.from_tensor_slices((image_paths, tokenized_texts))
    dataset = dataset.shuffle(batch_size * 10)
    dataset = dataset.map(process_image, num_parallel_calls=AUTO).batch(batch_size)
    dataset = dataset.map(apply_augmentation, num_parallel_calls=AUTO)
    dataset = dataset.map(run_text_encoder, num_parallel_calls=AUTO)
    dataset = dataset.map(prepare_dict, num_parallel_calls=AUTO)
    return dataset.prefetch(AUTO)
基準 Stable Diffusion 模型是使用 512x512 解析度的圖像進行訓練的。使用較高解析度圖像訓練的模型不太可能很好地轉換為較低解析度的圖像。但是,如果我們將解析度保持在 512x512(不啟用混合精度),則當前模型將導致 OOM。因此,為了進行互動式示範,我們將輸入解析度保持在 256x256。
# Prepare the dataset.
training_dataset = prepare_dataset(
    np.array(data_frame["image_path"]), tokenized_texts, batch_size=4
)

# Take a sample batch and investigate.
sample_batch = next(iter(training_dataset))

for k in sample_batch:
    print(k, sample_batch[k].shape)
images (4, 256, 256, 3)
tokens (4, 77)
encoded_text (4, 77, 768)
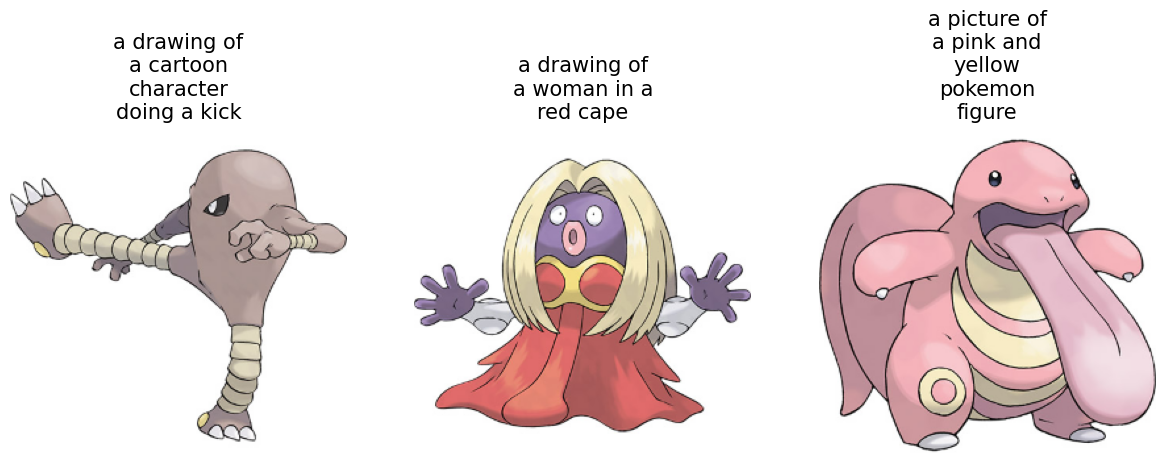
我們還可以看一下訓練圖像及其對應的文字描述。
plt.figure(figsize=(20, 10))

for i in range(3):
    ax = plt.subplot(1, 4, i + 1)
    plt.imshow((sample_batch["images"][i] + 1) / 2)

    text = tokenizer.decode(sample_batch["tokens"][i].numpy().squeeze())
    text = text.replace("<|startoftext|>", "")
    text = text.replace("<|endoftext|>", "")
    text = "\n".join(wrap(text, 12))
    plt.title(text, fontsize=15)

    plt.axis("off")
用於微調迴圈的訓練器類別
class Trainer(tf.keras.Model):
    # Reference:
    # https://github.com/huggingface/diffusers/blob/main/examples/text_to_image/train_text_to_image.py

    def __init__(
        self,
        diffusion_model,
        vae,
        noise_scheduler,
        use_mixed_precision=False,
        max_grad_norm=1.0,
        **kwargs
    ):
        super().__init__(**kwargs)

        self.diffusion_model = diffusion_model
        self.vae = vae
        self.noise_scheduler = noise_scheduler
        self.max_grad_norm = max_grad_norm

        self.use_mixed_precision = use_mixed_precision
        self.vae.trainable = False

    def train_step(self, inputs):
        images = inputs["images"]
        encoded_text = inputs["encoded_text"]
        batch_size = tf.shape(images)[0]

        with tf.GradientTape() as tape:
            # Project image into the latent space and sample from it.
            latents = self.sample_from_encoder_outputs(self.vae(images, training=False))
            # Know more about the magic number here:
            # https://keras.dev.org.tw/examples/generative/fine_tune_via_textual_inversion/
            latents = latents * 0.18215

            # Sample noise that we'll add to the latents.
            noise = tf.random.normal(tf.shape(latents))

            # Sample a random timestep for each image.
            timesteps = tnp.random.randint(
                0, self.noise_scheduler.train_timesteps, (batch_size,)
            )

            # Add noise to the latents according to the noise magnitude at each timestep
            # (this is the forward diffusion process).
            noisy_latents = self.noise_scheduler.add_noise(
                tf.cast(latents, noise.dtype), noise, timesteps
            )

            # Get the target for loss depending on the prediction type
            # just the sampled noise for now.
            target = noise  # noise_schedule.predict_epsilon == True

            # Predict the noise residual and compute loss.
            timestep_embedding = tf.map_fn(
                lambda t: self.get_timestep_embedding(t), timesteps, dtype=tf.float32
            )
            timestep_embedding = tf.squeeze(timestep_embedding, 1)
            model_pred = self.diffusion_model(
                [noisy_latents, timestep_embedding, encoded_text], training=True
            )
            loss = self.compiled_loss(target, model_pred)
            if self.use_mixed_precision:
                loss = self.optimizer.get_scaled_loss(loss)

        # Update parameters of the diffusion model.
        trainable_vars = self.diffusion_model.trainable_variables
        gradients = tape.gradient(loss, trainable_vars)
        if self.use_mixed_precision:
            gradients = self.optimizer.get_unscaled_gradients(gradients)
        gradients = [tf.clip_by_norm(g, self.max_grad_norm) for g in gradients]
        self.optimizer.apply_gradients(zip(gradients, trainable_vars))

        return {m.name: m.result() for m in self.metrics}

    def get_timestep_embedding(self, timestep, dim=320, max_period=10000):
        half = dim // 2
        log_max_period = tf.math.log(tf.cast(max_period, tf.float32))
        freqs = tf.math.exp(
            -log_max_period * tf.range(0, half, dtype=tf.float32) / half
        )
        args = tf.convert_to_tensor([timestep], dtype=tf.float32) * freqs
        embedding = tf.concat([tf.math.cos(args), tf.math.sin(args)], 0)
        embedding = tf.reshape(embedding, [1, -1])
        return embedding

    def sample_from_encoder_outputs(self, outputs):
        mean, logvar = tf.split(outputs, 2, axis=-1)
        logvar = tf.clip_by_value(logvar, -30.0, 20.0)
        std = tf.exp(0.5 * logvar)
        sample = tf.random.normal(tf.shape(mean), dtype=mean.dtype)
        return mean + std * sample

    def save_weights(self, filepath, overwrite=True, save_format=None, options=None):
        # Overriding this method will allow us to use the `ModelCheckpoint`
        # callback directly with this trainer class. In this case, it will
        # only checkpoint the `diffusion_model` since that's what we're training
        # during fine-tuning.
        self.diffusion_model.save_weights(
            filepath=filepath,
            overwrite=overwrite,
            save_format=save_format,
            options=options,
        )
這裡要注意的一個重要實作細節:我們不直接採用圖像編碼器(它是 VAE)產生的潛在向量,而是從它預測的平均值和對數變異數中取樣。這樣,我們可以實現更好的樣本品質和多樣性。
通常會新增對混合精度訓練和模型權重的指數移動平均值的支援,以便對這些模型進行微調。但是,為了簡潔起見,我們將這些元素丟棄。有關此內容的更多資訊,請參閱本教學的後續部分。
初始化訓練器並編譯它
# Enable mixed-precision training if the underlying GPU has tensor cores.
USE_MP = True
if USE_MP:
    keras.mixed_precision.set_global_policy("mixed_float16")

image_encoder = ImageEncoder()
diffusion_ft_trainer = Trainer(
    diffusion_model=DiffusionModel(RESOLUTION, RESOLUTION, MAX_PROMPT_LENGTH),
    # Remove the top layer from the encoder, which cuts off the variance and only
    # returns the mean.
    vae=tf.keras.Model(
        image_encoder.input,
        image_encoder.layers[-2].output,
    ),
    noise_scheduler=NoiseScheduler(),
    use_mixed_precision=USE_MP,
)

# These hyperparameters come from this tutorial by Hugging Face:
# https://huggingface.co/docs/diffusers/training/text2image
lr = 1e-5
beta_1, beta_2 = 0.9, 0.999
weight_decay = (1e-2,)
epsilon = 1e-08

optimizer = tf.keras.optimizers.experimental.AdamW(
    learning_rate=lr,
    weight_decay=weight_decay,
    beta_1=beta_1,
    beta_2=beta_2,
    epsilon=epsilon,
)
diffusion_ft_trainer.compile(optimizer=optimizer, loss="mse")
微調
為了縮短本教學的執行時間,我們僅微調一個週期。
epochs = 1
ckpt_path = "finetuned_stable_diffusion.h5"
ckpt_callback = tf.keras.callbacks.ModelCheckpoint(
    ckpt_path,
    save_weights_only=True,
    monitor="loss",
    mode="min",
)
diffusion_ft_trainer.fit(training_dataset, epochs=epochs, callbacks=[ckpt_callback])
推論
我們在 512x512 的圖像解析度上對模型進行了 60 個週期的微調。為了允許使用此解析度進行訓練,我們加入了混合精度支援。您可以查看 此儲存庫 以了解更多詳細資訊。此外,它還支援對微調模型參數和模型檢查點進行指數移動平均。
在本節中,我們將使用微調 60 個週期後取得的檢查點。
weights_path = tf.keras.utils.get_file(
    origin="https://huggingface.co/sayakpaul/kerascv_sd_pokemon_finetuned/resolve/main/ckpt_epochs_72_res_512_mp_True.h5"
)

img_height = img_width = 512
pokemon_model = keras_cv.models.StableDiffusion(
    img_width=img_width, img_height=img_height
)
# We just reload the weights of the fine-tuned diffusion model.
pokemon_model.diffusion_model.load_weights(weights_path)
By using this model checkpoint, you acknowledge that its usage is subject to the terms of the CreativeML Open RAIL-M license at https://raw.githubusercontent.com/CompVis/stable-diffusion/main/LICENSE
現在,我們可以試用這個模型了。
prompts = ["Yoda", "Hello Kitty", "A pokemon with red eyes"]
images_to_generate = 3
outputs = {}

for prompt in prompts:
    generated_images = pokemon_model.text_to_image(
        prompt, batch_size=images_to_generate, unconditional_guidance_scale=40
    )
    outputs.update({prompt: generated_images})
25/25 [==============================] - 17s 231ms/step
25/25 [==============================] - 6s 229ms/step
25/25 [==============================] - 6s 229ms/step
經過 60 個週期的微調(一個好的數字約為 70),生成的圖像未達到標準。因此,我們實驗了 Stable Diffusion 在推論期間採取的步驟數和 unconditional_guidance_scale 參數。
我們發現此檢查點在 unconditional_guidance_scale 設定為 40 時效果最佳。
def plot_images(images, title):
    plt.figure(figsize=(20, 20))
    for i in range(len(images)):
        ax = plt.subplot(1, len(images), i + 1)
        plt.imshow(images[i])
        plt.title(title, fontsize=12)
        plt.axis("off")


for prompt in outputs:
    plot_images(outputs[prompt], prompt)
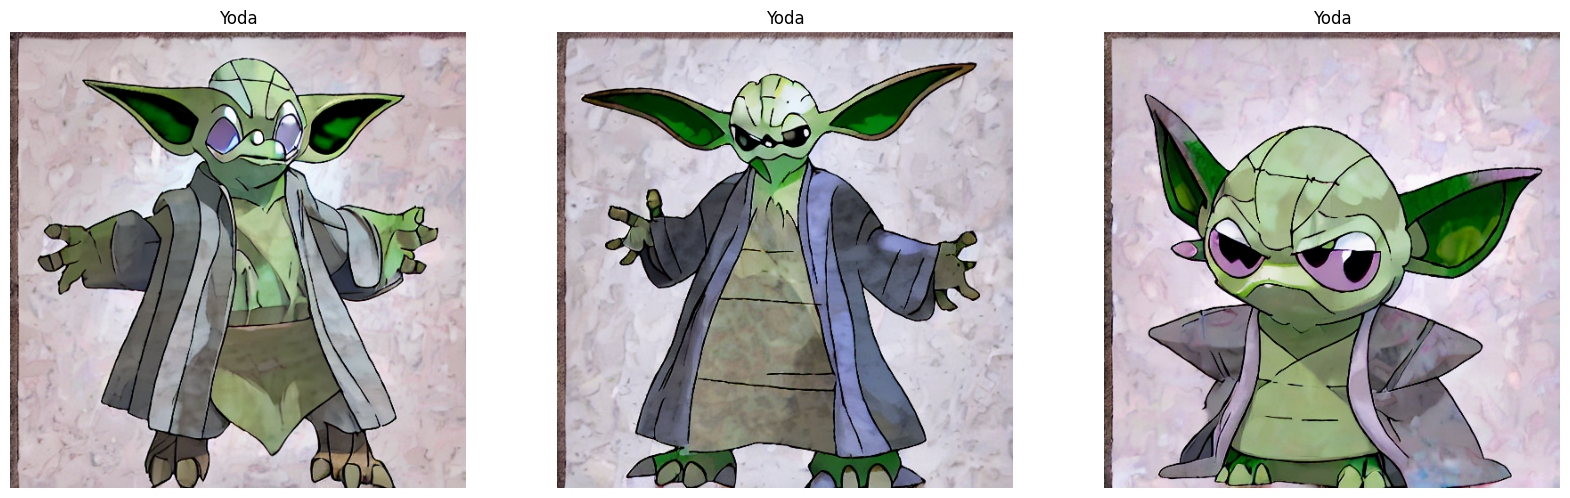
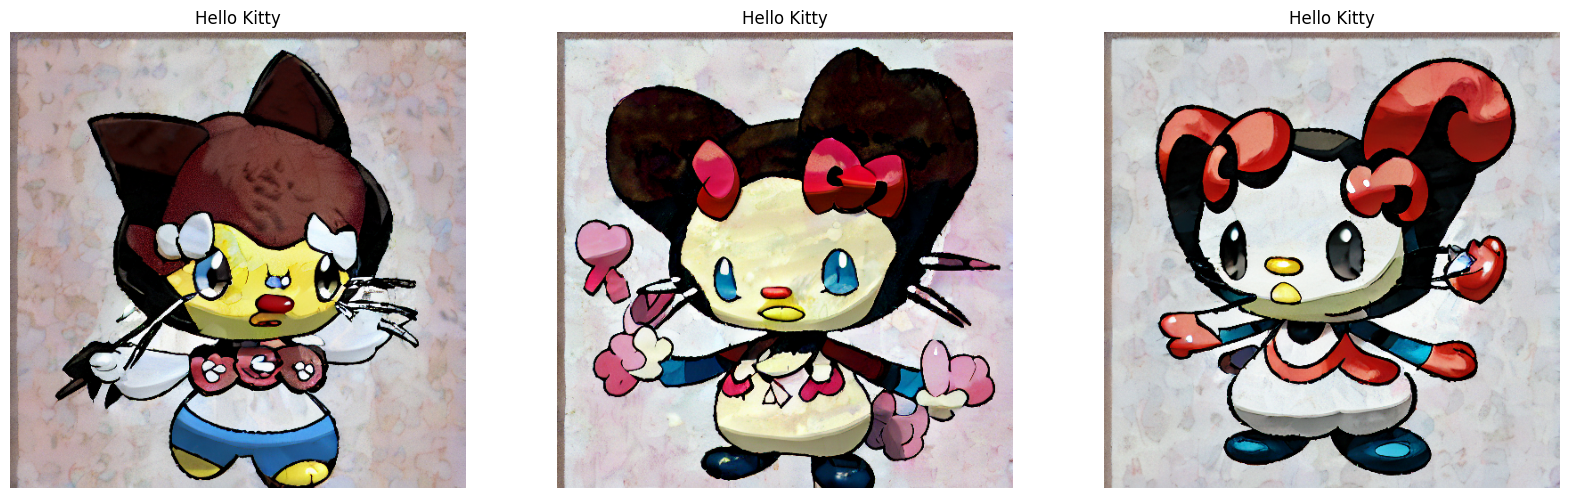
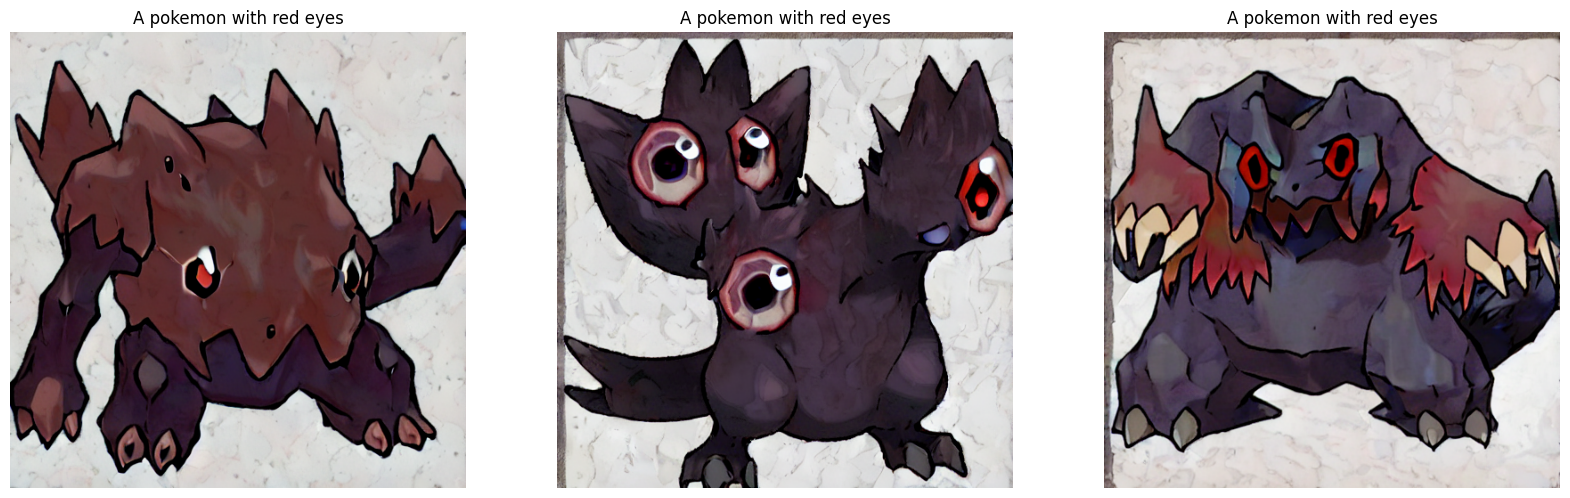
我們可以看到,模型已開始適應我們資料集的風格。您可以查看 隨附的儲存庫 以了解更多比較和評論。如果您想嘗試演示,可以查看 此資源。
結論和感謝
我們示範了如何在自訂資料集上微調 Stable Diffusion 模型。雖然結果遠非美觀,但我們相信,經過更多週期的微調,它們可能會有所改善。為此,支援梯度累積和分散式訓練至關重要。這可以被認為是本教學的下一步。
還有另一種有趣的方式可以微調 Stable Diffusion 模型,稱為文字反轉。您可以參考 本教學 以了解更多相關資訊。
我們要感謝 Google ML 開發人員計畫團隊的 GCP 信用支援。我們要感謝 Hugging Face 團隊提供 微調腳本 。它非常容易閱讀和理解。