如何在 TFRecord 檔案上訓練 Keras 模型
作者: Amy MiHyun Jang
建立日期 2020/07/29
上次修改日期 2020/08/07

描述:載入用於電腦視覺模型的 TFRecord。
簡介 + 設定
TFRecord 儲存二進位記錄的序列,以線性方式讀取。它們是儲存資料的有用格式,因為它們可以有效率地讀取。在此處了解有關 TFRecord 的更多資訊 這裡。
我們將探索如何輕鬆載入用於黑色素瘤分類器的 TFRecord。
import tensorflow as tf
from functools import partial
import matplotlib.pyplot as plt

try:
    tpu = tf.distribute.cluster_resolver.TPUClusterResolver.connect()
    print("Device:", tpu.master())
    strategy = tf.distribute.TPUStrategy(tpu)
except:
    strategy = tf.distribute.get_strategy()
print("Number of replicas:", strategy.num_replicas_in_sync)
Number of replicas: 8
我們希望更大的批次大小,因為我們的資料不平衡。
AUTOTUNE = tf.data.AUTOTUNE
GCS_PATH = "gs://kds-b38ce1b823c3ae623f5691483dbaa0f0363f04b0d6a90b63cf69946e"
BATCH_SIZE = 64
IMAGE_SIZE = [1024, 1024]
載入資料
FILENAMES = tf.io.gfile.glob(GCS_PATH + "/tfrecords/train*.tfrec")
split_ind = int(0.9 * len(FILENAMES))
TRAINING_FILENAMES, VALID_FILENAMES = FILENAMES[:split_ind], FILENAMES[split_ind:]

TEST_FILENAMES = tf.io.gfile.glob(GCS_PATH + "/tfrecords/test*.tfrec")
print("Train TFRecord Files:", len(TRAINING_FILENAMES))
print("Validation TFRecord Files:", len(VALID_FILENAMES))
print("Test TFRecord Files:", len(TEST_FILENAMES))
Train TFRecord Files: 14
Validation TFRecord Files: 2
Test TFRecord Files: 16
解碼資料
影像必須轉換為張量,使其成為我們模型中的有效輸入。由於影像使用 RBG 比例,因此我們指定 3 個通道。
我們也重塑資料,使所有影像都具有相同的形狀。
def decode_image(image):
    image = tf.image.decode_jpeg(image, channels=3)
    image = tf.cast(image, tf.float32)
    image = tf.reshape(image, [*IMAGE_SIZE, 3])
    return image
當我們載入資料時,我們需要我們的 X 和 Y。X 是我們的影像;模型將在我們的影像資料集中尋找特徵和模式。我們想要預測 Y,影像中病灶為惡性的機率。我們將遍歷我們的 TFRecord 並解析出影像和目標值。
def read_tfrecord(example, labeled):
    tfrecord_format = (
        {
            "image": tf.io.FixedLenFeature([], tf.string),
            "target": tf.io.FixedLenFeature([], tf.int64),
        }
        if labeled
        else {"image": tf.io.FixedLenFeature([], tf.string),}
    )
    example = tf.io.parse_single_example(example, tfrecord_format)
    image = decode_image(example["image"])
    if labeled:
        label = tf.cast(example["target"], tf.int32)
        return image, label
    return image
定義載入方法
我們的資料集沒有以任何有意義的方式排序,因此在載入資料集時可以忽略順序。藉由忽略順序並在檔案一進入時立即讀取,載入資料將花費更少的時間。
def load_dataset(filenames, labeled=True):
    ignore_order = tf.data.Options()
    ignore_order.experimental_deterministic = False  # disable order, increase speed
    dataset = tf.data.TFRecordDataset(
        filenames
    )  # automatically interleaves reads from multiple files
    dataset = dataset.with_options(
        ignore_order
    )  # uses data as soon as it streams in, rather than in its original order
    dataset = dataset.map(
        partial(read_tfrecord, labeled=labeled), num_parallel_calls=AUTOTUNE
    )
    # returns a dataset of (image, label) pairs if labeled=True or just images if labeled=False
    return dataset
我們定義以下函式來取得不同的資料集。
def get_dataset(filenames, labeled=True):
    dataset = load_dataset(filenames, labeled=labeled)
    dataset = dataset.shuffle(2048)
    dataset = dataset.prefetch(buffer_size=AUTOTUNE)
    dataset = dataset.batch(BATCH_SIZE)
    return dataset
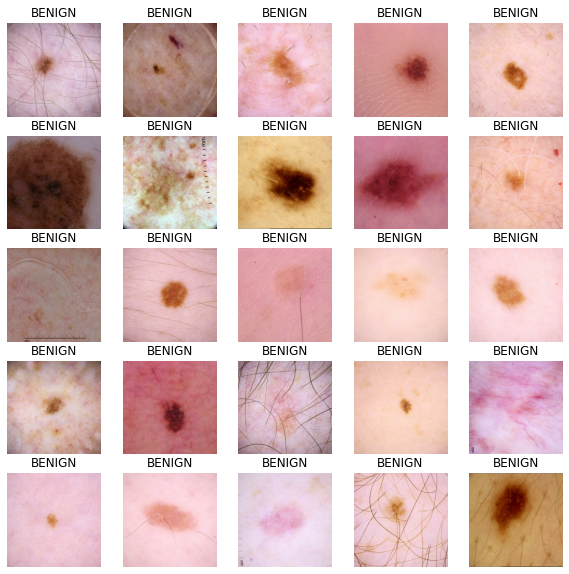
視覺化輸入影像
train_dataset = get_dataset(TRAINING_FILENAMES)
valid_dataset = get_dataset(VALID_FILENAMES)
test_dataset = get_dataset(TEST_FILENAMES, labeled=False)

image_batch, label_batch = next(iter(train_dataset))


def show_batch(image_batch, label_batch):
    plt.figure(figsize=(10, 10))
    for n in range(25):
        ax = plt.subplot(5, 5, n + 1)
        plt.imshow(image_batch[n] / 255.0)
        if label_batch[n]:
            plt.title("MALIGNANT")
        else:
            plt.title("BENIGN")
        plt.axis("off")


show_batch(image_batch.numpy(), label_batch.numpy())
建立我們的模型
定義回呼
以下函式允許模型在每次執行週期時變更學習率。
當模型沒有改善時,我們可以利用回呼來停止訓練。在訓練過程結束時,模型將還原其最佳迭代的權重。
initial_learning_rate = 0.01
lr_schedule = tf.keras.optimizers.schedules.ExponentialDecay(
    initial_learning_rate, decay_steps=20, decay_rate=0.96, staircase=True
)

checkpoint_cb = tf.keras.callbacks.ModelCheckpoint(
    "melanoma_model.h5", save_best_only=True
)

early_stopping_cb = tf.keras.callbacks.EarlyStopping(
    patience=10, restore_best_weights=True
)
建立我們的基本模型
轉移學習是在沒有自行訓練模型的情況下,獲得良好訓練模型優點的好方法。對於此筆記本,我們想要匯入 Xception 模型。有關轉移學習的更深入分析,請見這裡。
我們不希望我們的指標是 accuracy,因為我們的資料不平衡。對於我們的範例,我們將查看 ROC 曲線下的面積。
def make_model():
    base_model = tf.keras.applications.Xception(
        input_shape=(*IMAGE_SIZE, 3), include_top=False, weights="imagenet"
    )

    base_model.trainable = False

    inputs = tf.keras.layers.Input([*IMAGE_SIZE, 3])
    x = tf.keras.applications.xception.preprocess_input(inputs)
    x = base_model(x)
    x = tf.keras.layers.GlobalAveragePooling2D()(x)
    x = tf.keras.layers.Dense(8, activation="relu")(x)
    x = tf.keras.layers.Dropout(0.7)(x)
    outputs = tf.keras.layers.Dense(1, activation="sigmoid")(x)

    model = tf.keras.Model(inputs=inputs, outputs=outputs)

    model.compile(
        optimizer=tf.keras.optimizers.Adam(learning_rate=lr_schedule),
        loss="binary_crossentropy",
        metrics=tf.keras.metrics.AUC(name="auc"),
    )

    return model
訓練模型
with strategy.scope():
    model = make_model()

history = model.fit(
    train_dataset,
    epochs=2,
    validation_data=valid_dataset,
    callbacks=[checkpoint_cb, early_stopping_cb],
)
Downloading data from https://storage.googleapis.com/tensorflow/keras-applications/xception/xception_weights_tf_dim_ordering_tf_kernels_notop.h5
83689472/83683744 [==============================] - 3s 0us/step
Epoch 1/2
454/454 [==============================] - 525s 1s/step - loss: 0.1895 - auc: 0.5841 - val_loss: 0.0825 - val_auc: 0.8109
Epoch 2/2
454/454 [==============================] - 118s 260ms/step - loss: 0.1063 - auc: 0.5994 - val_loss: 0.0861 - val_auc: 0.8336
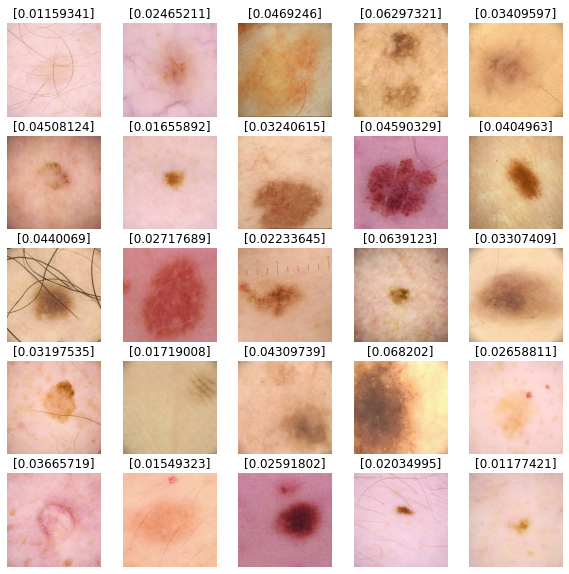
預測結果
我們將使用我們的模型來預測測試資料集影像的結果。值越接近 0,越有可能為良性;值越接近 1,越有可能為惡性。
def show_batch_predictions(image_batch):
    plt.figure(figsize=(10, 10))
    for n in range(25):
        ax = plt.subplot(5, 5, n + 1)
        plt.imshow(image_batch[n] / 255.0)
        img_array = tf.expand_dims(image_batch[n], axis=0)
        plt.title(model.predict(img_array)[0])
        plt.axis("off")


image_batch = next(iter(test_dataset))

show_batch_predictions(image_batch)