使用 🤗 Transformers 和 TPU 從頭開始訓練語言模型
作者: Matthew Carrigan、Sayak Paul
建立日期 2023/05/21
上次修改日期 2023/05/21
說明:使用 🤗 Transformers 在 TPU 上訓練遮罩語言模型。

簡介
在此範例中,我們將介紹如何使用 TensorFlow、🤗 Transformers 和 TPU 訓練遮罩語言模型。
TPU 訓練是一項有用的技能:TPU pod 具有高效能且可高度擴展的特性,可以輕鬆地訓練從數千萬個參數到真正龐大規模的模型:Google 的 PaLM 模型(超過 5000 億個參數!)完全是在 TPU pod 上訓練的。
我們之前寫了一篇教學文章和一個Colab 範例,示範如何使用 TensorFlow 進行小規模的 TPU 訓練,並介紹您需要了解的核心概念,以便讓您的模型在 TPU 上運作。但是,我們的 Colab 範例並未包含從頭開始訓練語言模型所需的所有步驟,例如訓練標記器。因此,我們想提供一個完整的範例,逐步引導您完成每個關鍵步驟。
如同我們的 Colab 範例,我們利用 TensorFlow 透過 XLA 和 TPUStrategy 提供的非常簡潔的 TPU 支援。我們也將受益於 🤗 Transformers 中大多數 TensorFlow 模型都完全與 XLA 相容的事實。因此,令人驚訝的是,只需要很少的工作就能讓它們在 TPU 上運行。
這個範例的設計具有可擴展性,並且更接近實際的訓練運行 - 雖然我們預設只使用 BERT 大小的模型,但透過更改一些配置選項,程式碼可以擴展到更大的模型和更強大的 TPU pod 切片。
下圖概述了使用 🤗 Transformers、TensorFlow 和 TPU 訓練語言模型所涉及的步驟

(此範例的內容與這篇部落格文章重疊)。
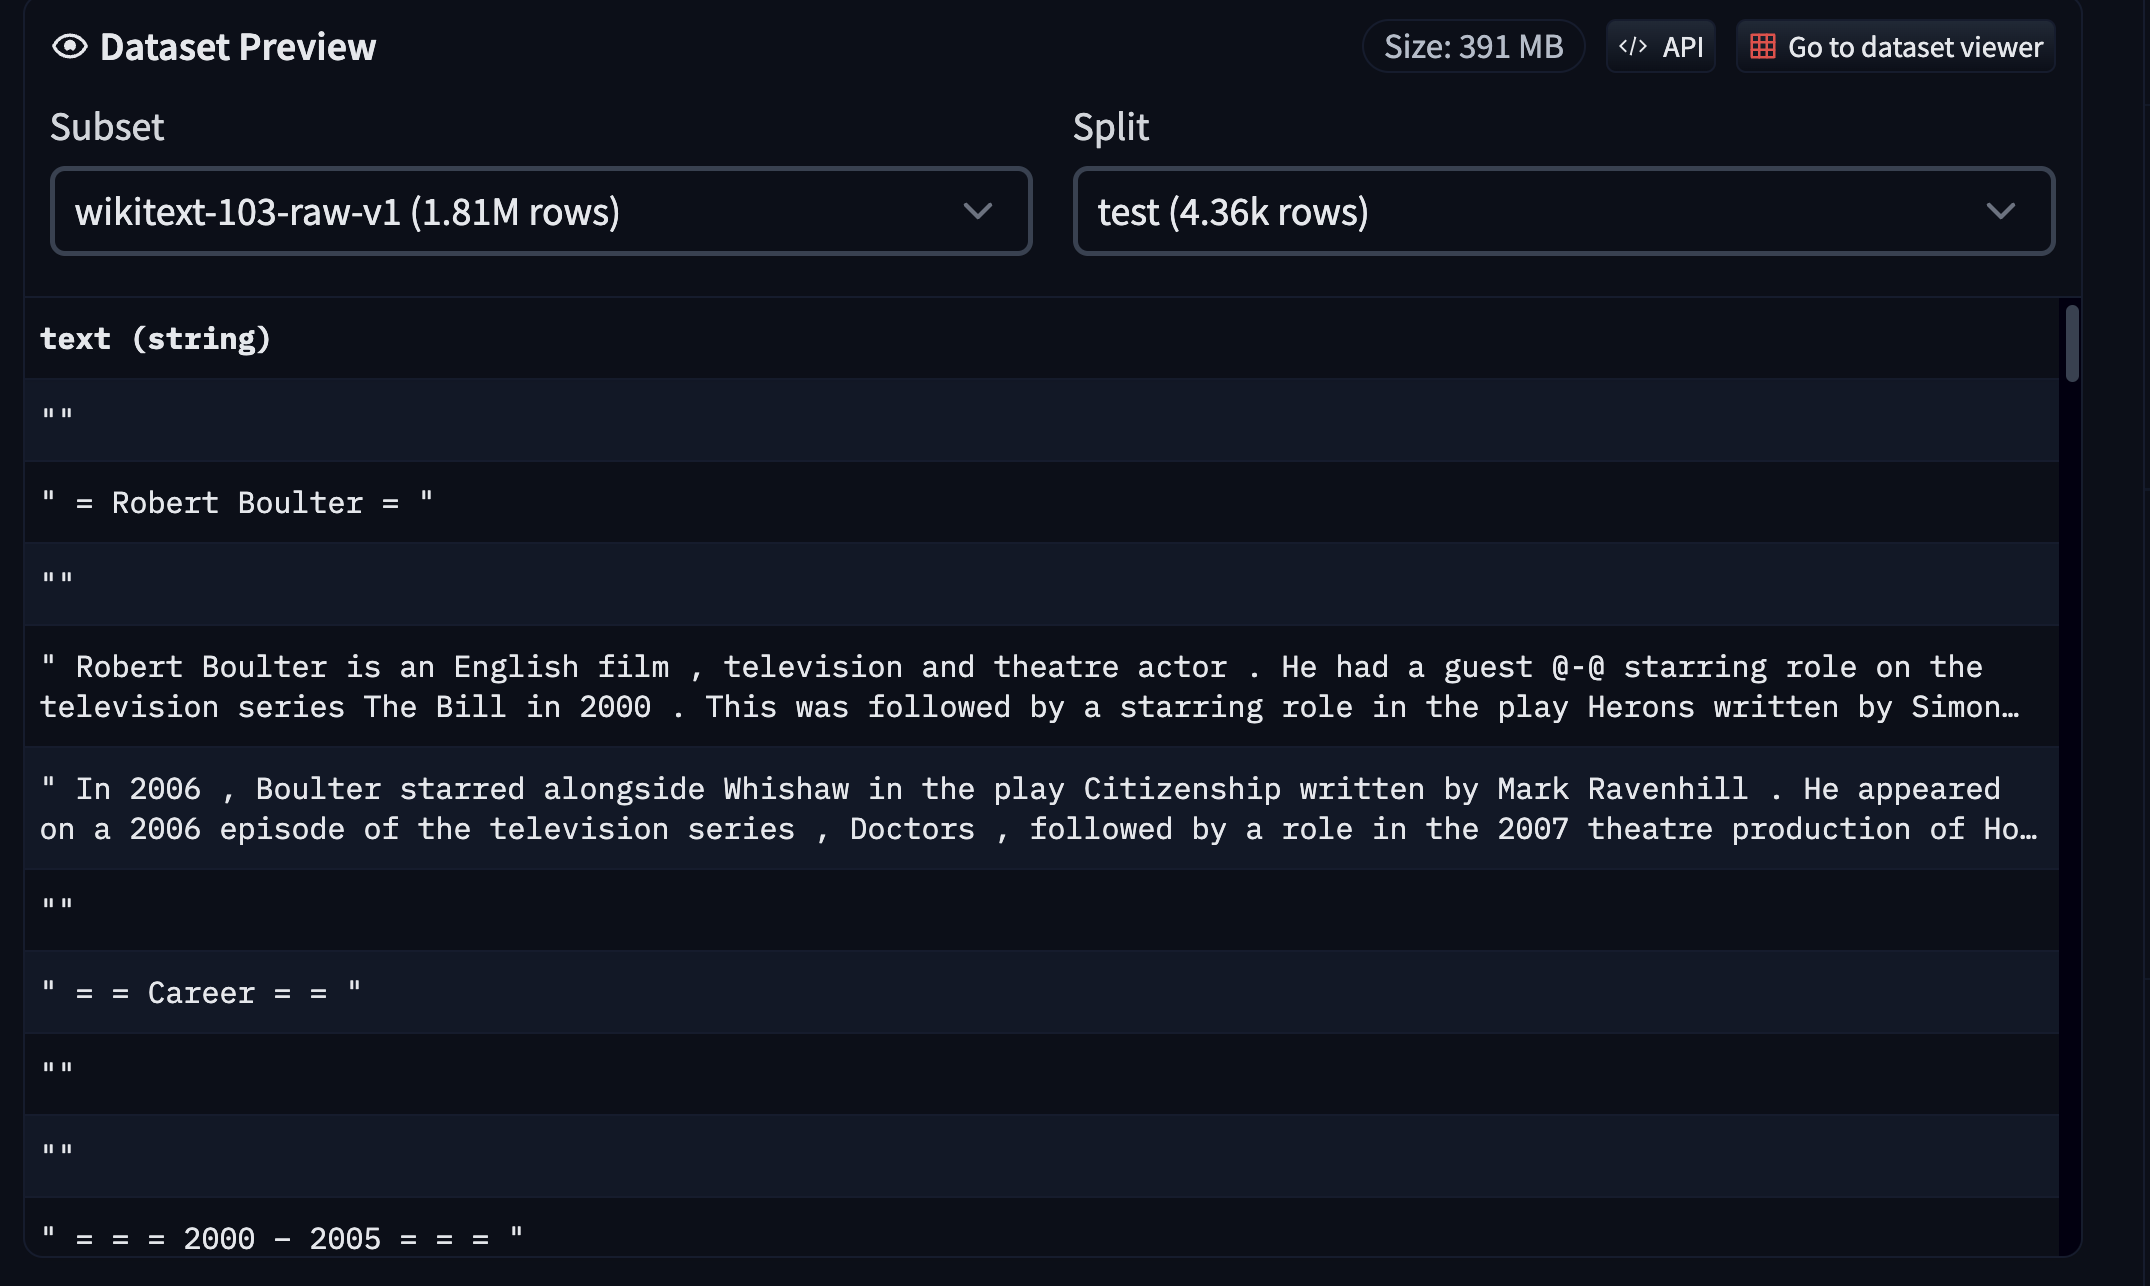
數據
我們使用WikiText 資料集(v1)。您可以前往Hugging Face Hub 上的資料集頁面瀏覽資料集。
由於資料集已經在 Hub 上以相容的格式提供,我們可以使用🤗 datasets輕鬆載入和互動。但是,從頭開始訓練語言模型也需要一個單獨的標記器訓練步驟。為了簡潔起見,我們在此範例中跳過了該部分,但是,以下是我們可以從頭開始訓練標記器的要點
- 使用 🤗 datasets 載入 WikiText 的
train切割。 - 利用🤗 tokenizers訓練一個Unigram 模型。
- 將訓練好的標記器上傳到 Hub。
您可以在這裡找到標記器訓練程式碼,以及在這裡找到標記器。此腳本也允許您使用 Hub 中任何相容的資料集運行它。
將資料標記化並建立 TFRecord
標記器訓練完成後,我們就可以將其用於所有資料集分割(在這種情況下為 train、validation 和 test),並從中建立 TFRecord 分片。將資料分割到多個 TFRecord 分片有助於大規模平行處理,而不是將每個分割都放在單個 TFRecord 檔案中。
我們會個別對樣本進行分詞。然後,我們會取得一批樣本,將它們串聯在一起,並將它們分割成幾個固定大小的區塊(在我們的例子中是 128)。我們遵循這種策略,而不是用固定長度對一批樣本進行分詞,以避免過度丟棄文字內容(因為截斷)。
然後,我們會分批取得這些已分詞的樣本,並將這些批次序列化為多個 TFRecord 分片,其中總數據集長度和個別分片大小決定了分片的數量。最後,這些分片會被推送至 Google Cloud Storage (GCS) 儲存空間。
如果您使用 TPU 節點進行訓練,則需要從 GCS 儲存空間串流資料,因為節點主機記憶體非常小。但對於 TPU VM,我們可以在本機使用數據集,甚至可以將永久儲存空間附加到這些 VM。由於 TPU 節點(這是在 Colab 中擁有的)仍然被大量使用,因此我們的範例基於使用 GCS 儲存空間進行資料儲存。
您可以在 這個腳本 中看到所有這些程式碼。為了方便起見,我們還將產生的 TFRecord 分片託管在 Hub 上的 這個儲存庫 中。
將資料分詞並序列化為 TFRecord 分片後,我們就可以繼續進行訓練。
訓練
設定和導入
讓我們先安裝 🤗 Transformers。
!pip install transformers -q
然後,讓我們導入我們需要的模組。
import os
import re

import tensorflow as tf

import transformers
初始化 TPU
然後讓我們連接到我們的 TPU 並確定分配策略
tpu = tf.distribute.cluster_resolver.TPUClusterResolver()

tf.config.experimental_connect_to_cluster(tpu)
tf.tpu.experimental.initialize_tpu_system(tpu)

strategy = tf.distribute.TPUStrategy(tpu)

print(f"Available number of replicas: {strategy.num_replicas_in_sync}")
Available number of replicas: 8
然後我們載入分詞器。有關分詞器的更多詳細資訊,請查看 其儲存庫。對於模型,我們使用 RoBERTa(基本變體),在 這篇論文 中有介紹。
初始化分詞器
tokenizer = "tf-tpu/unigram-tokenizer-wikitext"
pretrained_model_config = "roberta-base"

tokenizer = transformers.AutoTokenizer.from_pretrained(tokenizer)
config = transformers.AutoConfig.from_pretrained(pretrained_model_config)
config.vocab_size = tokenizer.vocab_size
Downloading (…)okenizer_config.json:   0%|          | 0.00/483 [00:00<?, ?B/s]

Downloading (…)/main/tokenizer.json:   0%|          | 0.00/1.61M [00:00<?, ?B/s]

Downloading (…)cial_tokens_map.json:   0%|          | 0.00/286 [00:00<?, ?B/s]

Downloading (…)lve/main/config.json:   0%|          | 0.00/481 [00:00<?, ?B/s]
準備數據集
我們現在載入 WikiText 數據集的 TFRecord 分片(Hugging Face 團隊事先為此範例準備好了)
train_dataset_path = "gs://tf-tpu-training-resources/train"
eval_dataset_path = "gs://tf-tpu-training-resources/validation"

training_records = tf.io.gfile.glob(os.path.join(train_dataset_path, "*.tfrecord"))
eval_records = tf.io.gfile.glob(os.path.join(eval_dataset_path, "*.tfrecord"))
現在,我們將編寫一個工具程式來計算我們擁有的訓練樣本數量。我們需要知道這個值,以便稍後正確初始化我們的優化器
def count_samples(file_list):
    num_samples = 0
    for file in file_list:
        filename = file.split("/")[-1]
        sample_count = re.search(r"-\d+-(\d+)\.tfrecord", filename).group(1)
        sample_count = int(sample_count)
        num_samples += sample_count

    return num_samples


num_train_samples = count_samples(training_records)
print(f"Number of total training samples: {num_train_samples}")
Number of total training samples: 300917
現在讓我們準備好我們的數據集以進行訓練和評估。我們先編寫我們的工具程式。首先,我們需要能夠解碼 TFRecord
max_sequence_length = 512


def decode_fn(example):
    features = {
        "input_ids": tf.io.FixedLenFeature(
            dtype=tf.int64, shape=(max_sequence_length,)
        ),
        "attention_mask": tf.io.FixedLenFeature(
            dtype=tf.int64, shape=(max_sequence_length,)
        ),
    }
    return tf.io.parse_single_example(example, features)
在這裡,max_sequence_length 必須與準備 TFRecord 分片時使用的相同。有關更多詳細資訊,請參閱 這個腳本。
接下來,我們有遮罩工具程式,負責遮罩輸入的一部分並準備標籤,以便遮罩語言模型從中學習。我們為此目的利用了 DataCollatorForLanguageModeling。
# We use a standard masking probability of 0.15. `mlm_probability` denotes
# probability with which we mask the input tokens in a sequence.
mlm_probability = 0.15
data_collator = transformers.DataCollatorForLanguageModeling(
    tokenizer=tokenizer, mlm_probability=mlm_probability, mlm=True, return_tensors="tf"
)


def mask_with_collator(batch):
    special_tokens_mask = (
        ~tf.cast(batch["attention_mask"], tf.bool)
        | (batch["input_ids"] == tokenizer.cls_token_id)
        | (batch["input_ids"] == tokenizer.sep_token_id)
    )
    batch["input_ids"], batch["labels"] = data_collator.tf_mask_tokens(
        batch["input_ids"],
        vocab_size=len(tokenizer),
        mask_token_id=tokenizer.mask_token_id,
        special_tokens_mask=special_tokens_mask,
    )
    return batch
現在是時候編寫最終的資料準備工具程式,將所有內容整合到 tf.data.Dataset 物件中
auto = tf.data.AUTOTUNE
shuffle_buffer_size = 2**18


def prepare_dataset(
    records, decode_fn, mask_fn, batch_size, shuffle, shuffle_buffer_size=None
):
    num_samples = count_samples(records)
    dataset = tf.data.Dataset.from_tensor_slices(records)
    if shuffle:
        dataset = dataset.shuffle(len(dataset))
    dataset = tf.data.TFRecordDataset(dataset, num_parallel_reads=auto)
    # TF can't infer the total sample count because it doesn't read
    #  all the records yet, so we assert it here.
    dataset = dataset.apply(tf.data.experimental.assert_cardinality(num_samples))
    dataset = dataset.map(decode_fn, num_parallel_calls=auto)
    if shuffle:
        assert shuffle_buffer_size is not None
        dataset = dataset.shuffle(shuffle_buffer_size)
    dataset = dataset.batch(batch_size, drop_remainder=True)
    dataset = dataset.map(mask_fn, num_parallel_calls=auto)
    dataset = dataset.prefetch(auto)
    return dataset
讓我們使用這些工具程式準備我們的數據集
per_replica_batch_size = 16  # Change as needed.
batch_size = per_replica_batch_size * strategy.num_replicas_in_sync
shuffle_buffer_size = 2**18  # Default corresponds to a 1GB buffer for seq_len 512

train_dataset = prepare_dataset(
    training_records,
    decode_fn=decode_fn,
    mask_fn=mask_with_collator,
    batch_size=batch_size,
    shuffle=True,
    shuffle_buffer_size=shuffle_buffer_size,
)

eval_dataset = prepare_dataset(
    eval_records,
    decode_fn=decode_fn,
    mask_fn=mask_with_collator,
    batch_size=batch_size,
    shuffle=False,
)
現在讓我們研究一下單一批次的數據集是什麼樣子。
single_batch = next(iter(train_dataset))
print(single_batch.keys())
dict_keys(['attention_mask', 'input_ids', 'labels'])
input_ids表示包含遮罩標記的輸入樣本的分詞版本。attention_mask表示在執行注意力操作時要使用的遮罩。labels表示模型應該學習的遮罩標記的實際值。
for k in single_batch:
    if k == "input_ids":
        input_ids = single_batch[k]
        print(f"Input shape: {input_ids.shape}")
    if k == "labels":
        labels = single_batch[k]
        print(f"Label shape: {labels.shape}")
Input shape: (128, 512)
Label shape: (128, 512)
現在,我們可以利用我們的 tokenizer 來研究標記的值。讓我們從 input_ids 開始
idx = 0
print("Taking the first sample:\n")
print(tokenizer.decode(input_ids[idx].numpy()))
Taking the first sample:
they called the character of Tsugum[MASK] one of the[MASK] tragic heroines[MASK] had encountered in a game. Chandran ranked the game as the third best role @[MASK][MASK] playing game from the sixth generation of video[MASK] consoles, saying that it was his favorite in the[MASK]Infinity[MASK], and one his favorite[MASK] games overall[MASK].[MASK]
[SEP][CLS][SEP][CLS][SEP][CLS] =[MASK] Sea party 1914[MASK]– 16 =
[SEP][CLS][SEP][CLS] The Ross Sea party was a component of Sir[MASK] Shackleton's Imperial Trans @-@ Antarctic Expedition 1914  garde 17.[MASK] task was to lay a series of supply depots across the Great Ice Barrier from the Ross Sea to the Beardmore Glacier, along the[MASK] route established by earlier Antarctic expeditions[MASK]. The expedition's main party, under[MASK], was to land[MASK]on the opposite, Weddell Sea coast of Antarctica [MASK] and to march across the continent via the South[MASK] to the Ross Sea. As the main party would be un[MASK] to carry[MASK] fuel and supplies for the whole distance[MASK], their survival depended on the Ross Sea party's depots[MASK][MASK][MASK] would cover the[MASK] quarter of their journey.
[SEP][CLS][MASK] set sail from London on[MASK] ship Endurance, bound[MASK] the Weddell Sea in August 1914. Meanwhile, the Ross Sea party[MASK] gathered in Australia, prior[MASK] Probabl for the Ross Sea in[MASK] second expedition ship, SY Aurora. Organisational and financial problems[MASK]ed their[MASK] until December 1914, which shortened their first depot @-@[MASK] season.[MASK][MASK] arrival the inexperienced party struggle[MASK] to master the art of Antarctic travel, in the[MASK] losing most of their sledge dogs [MASK]อ greater misfortune[MASK]ed when, at the onset of the southern winter, Aurora[MASK] torn from its [MASK]ings during [MASK] severe storm and was un[MASK] to return, leaving the shore party stranded.
[SEP][CLS] Crossroadspite[MASK] setbacks, the Ross Sea party survived inter @-@ personnel disputes, extreme weather[MASK], illness, and Pay deaths of three of its members to carry[MASK] its[MASK] in full during its[MASK] Antarctic season. This success proved ultimate[MASK] without purpose, because Shackleton's Grimaldi expedition was un
正如預期的那樣,解碼後的標記包含特殊標記,包括遮罩標記。現在讓我們研究一下遮罩標記
# Taking the first 30 tokens of the first sequence.
print(labels[0].numpy()[:30])
[-100 -100 -100 -100 -100 -100 -100 -100 -100   43 -100 -100 -100 -100
  351 -100 -100 -100   99 -100 -100 -100 -100 -100 -100 -100 -100 -100
 -100 -100]
在這裡,-100 表示 input_ids 中的對應標記**未**被遮罩,非 -100 的值表示遮罩標記的實際值。
初始化模型和優化器
在資料集準備好後,我們現在在 strategy.scope() 中初始化和編譯模型和優化器。
# For this example, we keep this value to 10. But for a realistic run, start with 500.
num_epochs = 10
steps_per_epoch = num_train_samples // (
    per_replica_batch_size * strategy.num_replicas_in_sync
)
total_train_steps = steps_per_epoch * num_epochs
learning_rate = 0.0001
weight_decay_rate = 1e-3

with strategy.scope():
    model = transformers.TFAutoModelForMaskedLM.from_config(config)
    model(
        model.dummy_inputs
    )  # Pass some dummy inputs through the model to ensure all the weights are built
    optimizer, schedule = transformers.create_optimizer(
        num_train_steps=total_train_steps,
        num_warmup_steps=total_train_steps // 20,
        init_lr=learning_rate,
        weight_decay_rate=weight_decay_rate,
    )
    model.compile(optimizer=optimizer, metrics=["accuracy"])
No loss specified in compile() - the model's internal loss computation will be used as the loss. Don't panic - this is a common way to train TensorFlow models in Transformers! To disable this behaviour please pass a loss argument, or explicitly pass `loss=None` if you do not want your model to compute a loss.
這裡需要注意幾點:* create_optimizer() 函數使用學習率排程創建一個 Adam 優化器,該排程使用預熱階段,然後是線性衰減。 由於我們在這裡使用權重衰減,因此在底層,create_optimizer() 會實例化 正確的 Adam 變體 來啟用權重衰減。 * 編譯模型時,我們沒有使用任何 loss 參數。 這是因為 TensorFlow 模型在提供預期標籤時會在內部計算損失。 根據所使用的模型類型和標籤,transformers 將自動推斷要使用的損失函數。
開始訓練!
接下來,我們設置一個方便的回調函數,將中間訓練檢查點推送到 Hugging Face Hub。 為了能夠操作此回調函數,我們需要登錄到我們的 Hugging Face 帳戶(如果您沒有,可以在 這裡 免費創建一個)。 執行以下代碼以登錄
from huggingface_hub import notebook_login

notebook_login()
現在讓我們定義 PushToHubCallback
hub_model_id = output_dir = "masked-lm-tpu"

callbacks = []
callbacks.append(
    transformers.PushToHubCallback(
        output_dir=output_dir, hub_model_id=hub_model_id, tokenizer=tokenizer
    )
)
Cloning https://huggingface.co/sayakpaul/masked-lm-tpu into local empty directory.
WARNING:huggingface_hub.repository:Cloning https://huggingface.co/sayakpaul/masked-lm-tpu into local empty directory.

Download file tf_model.h5:   0%|          | 15.4k/477M [00:00<?, ?B/s]

Clean file tf_model.h5:   0%|          | 1.00k/477M [00:00<?, ?B/s]
現在,我們準備好使用 TPU 了
# In the interest of the runtime of this example,
# we limit the number of batches to just 2.
model.fit(
    train_dataset.take(2),
    validation_data=eval_dataset.take(2),
    epochs=num_epochs,
    callbacks=callbacks,
)

# After training we also serialize the final model.
model.save_pretrained(output_dir)
Epoch 1/10
2/2 [==============================] - 96s 35s/step - loss: 10.2116 - accuracy: 0.0000e+00 - val_loss: 10.1957 - val_accuracy: 2.2888e-05
Epoch 2/10
2/2 [==============================] - 9s 2s/step - loss: 10.2017 - accuracy: 0.0000e+00 - val_loss: 10.1798 - val_accuracy: 0.0000e+00
Epoch 3/10
2/2 [==============================] - ETA: 0s - loss: 10.1890 - accuracy: 7.6294e-06

WARNING:tensorflow:Callback method `on_train_batch_end` is slow compared to the batch time (batch time: 0.0045s vs `on_train_batch_end` time: 9.1679s). Check your callbacks.

2/2 [==============================] - 35s 27s/step - loss: 10.1890 - accuracy: 7.6294e-06 - val_loss: 10.1604 - val_accuracy: 1.5259e-05
Epoch 4/10
2/2 [==============================] - 8s 2s/step - loss: 10.1733 - accuracy: 1.5259e-05 - val_loss: 10.1145 - val_accuracy: 7.6294e-06
Epoch 5/10
2/2 [==============================] - 34s 26s/step - loss: 10.1336 - accuracy: 1.5259e-05 - val_loss: 10.0666 - val_accuracy: 7.6294e-06
Epoch 6/10
2/2 [==============================] - 10s 2s/step - loss: 10.0906 - accuracy: 6.1035e-05 - val_loss: 10.0200 - val_accuracy: 5.4169e-04
Epoch 7/10
2/2 [==============================] - 33s 25s/step - loss: 10.0360 - accuracy: 6.1035e-04 - val_loss: 9.9646 - val_accuracy: 0.0049
Epoch 8/10
2/2 [==============================] - 8s 2s/step - loss: 9.9830 - accuracy: 0.0038 - val_loss: 9.8938 - val_accuracy: 0.0155
Epoch 9/10
2/2 [==============================] - 33s 26s/step - loss: 9.9067 - accuracy: 0.0116 - val_loss: 9.8225 - val_accuracy: 0.0198
Epoch 10/10
2/2 [==============================] - 8s 2s/step - loss: 9.8302 - accuracy: 0.0196 - val_loss: 9.7454 - val_accuracy: 0.0215
訓練完成後,您可以輕鬆執行推理,如下所示
from transformers import pipeline

# Replace your `model_id` here.
# Here, we're using a model that the Hugging Face team trained for longer.
model_id = "tf-tpu/roberta-base-epochs-500-no-wd"
unmasker = pipeline("fill-mask", model=model_id, framework="tf")
print(unmasker("Goal of my life is to [MASK]."))
Downloading (…)lve/main/config.json:   0%|          | 0.00/649 [00:00<?, ?B/s]

Downloading tf_model.h5:   0%|          | 0.00/500M [00:00<?, ?B/s]

All model checkpoint layers were used when initializing TFRobertaForMaskedLM.
All the layers of TFRobertaForMaskedLM were initialized from the model checkpoint at tf-tpu/roberta-base-epochs-500-no-wd.
If your task is similar to the task the model of the checkpoint was trained on, you can already use TFRobertaForMaskedLM for predictions without further training.

Downloading (…)okenizer_config.json:   0%|          | 0.00/683 [00:00<?, ?B/s]

Downloading (…)/main/tokenizer.json:   0%|          | 0.00/1.61M [00:00<?, ?B/s]

Downloading (…)cial_tokens_map.json:   0%|          | 0.00/286 [00:00<?, ?B/s]

[{'score': 0.10031876713037491, 'token': 52, 'token_str': 'be', 'sequence': 'Goal of my life is to be.'}, {'score': 0.032648470252752304, 'token': 5, 'token_str': '', 'sequence': 'Goal of my life is to .'}, {'score': 0.02152678370475769, 'token': 138, 'token_str': 'work', 'sequence': 'Goal of my life is to work.'}, {'score': 0.019547568634152412, 'token': 984, 'token_str': 'act', 'sequence': 'Goal of my life is to act.'}, {'score': 0.01939115859568119, 'token': 73, 'token_str': 'have', 'sequence': 'Goal of my life is to have.'}]
就是這樣!