使用 🤗Transformers 的 Segment Anything 模型
作者: Merve Noyan & Sayak Paul
建立日期 2023/07/11
上次修改 2023/07/11
描述: 使用 Keras 和 🤗 Transformers 微調 Segment Anything 模型。

簡介
大型語言模型 (LLM) 讓終端使用者可以透過「提示」輕鬆將其應用於各種應用。例如,如果我們想讓 LLM 預測以下句子的情感:「那部電影太棒了,我非常喜歡」,我們會用類似以下的內容提示 LLM:
以下句子的情感是什麼:「那部電影太棒了,我非常喜歡」?
作為回報,LLM 會傳回情感符號。
但是,當涉及到視覺辨識任務時,我們如何設計「視覺」線索來提示基礎視覺模型?例如,我們可以有一個輸入影像,並用該影像上的邊界框提示模型,並要求它執行分割。邊界框在這裡將作為我們的視覺提示。
在Segment Anything 模型(稱為 SAM)中,Meta 的研究人員將語言提示的空間擴展到視覺提示。受大型語言模型的啟發,SAM 能夠使用提示輸入執行零樣本分割。此處的提示可以是一組前景/背景點、自由文字、框或遮罩。有許多下游分割任務,包括語義分割和邊緣偵測。SAM 的目標是透過提示啟用所有這些下游分割任務。
在此範例中,我們將學習如何使用 🤗 Transformers 中的 SAM 模型進行推理和微調。
安裝
!!pip install -q git+https://github.com/huggingface/transformers
[]
讓我們匯入此範例所需的一切。
from tensorflow import keras
from transformers import TFSamModel, SamProcessor
import numpy as np
import tensorflow as tf
import matplotlib.pyplot as plt
from tensorflow.python.ops.numpy_ops import np_config
from PIL import Image
import requests
import glob
import os
/Users/mervenoyan/miniforge3/envs/py310/lib/python3.10/site-packages/tqdm/auto.py:21: TqdmWarning: IProgress not found. Please update jupyter and ipywidgets. See https://ipywidgets.readthedocs.io/en/stable/user_install.html
  from .autonotebook import tqdm as notebook_tqdm
簡述 SAM
SAM 具有以下元件
 |
|---|
| 影像取自官方SAM 部落格文章 |
影像編碼器負責計算影像嵌入。在與 SAM 互動時,我們會計算影像嵌入一次(因為影像編碼器很重),然後將其與上述不同的提示(點、邊界框、遮罩)重複使用。
點和框(所謂的稀疏提示)會通過輕量級提示編碼器,而遮罩(密集提示)會通過卷積層。我們將從影像編碼器提取的影像嵌入與提示嵌入耦合,兩者都進入輕量級遮罩解碼器。解碼器負責預測遮罩。
 |
|---|
| 圖取自SAM 論文 |
SAM 經過預訓練,可以為任何可接受的提示預測一個有效的遮罩。此要求允許 SAM 在提示難以理解時仍輸出有效的遮罩——這使 SAM 具有歧義感知能力。此外,SAM 會為單個提示預測多個遮罩。
我們強烈建議您查看SAM 論文和部落格文章,以了解有關 SAM 和用於預訓練的資料集的更多詳細資訊。
使用 SAM 執行推理
SAM 有三個檢查點
我們在 TFSamModel 中載入 sam-vit-base。我們也需要 SamProcessor 來處理相關的檢查點。
model = TFSamModel.from_pretrained("facebook/sam-vit-base")
processor = SamProcessor.from_pretrained("facebook/sam-vit-base")
All model checkpoint layers were used when initializing TFSamModel.
All the layers of TFSamModel were initialized from the model checkpoint at facebook/sam-vit-base.
If your task is similar to the task the model of the checkpoint was trained on, you can already use TFSamModel for predictions without further training.
接下來,我們編寫一些用於視覺化的實用函數。這些函數大多取自 這個筆記本。
np_config.enable_numpy_behavior()


def show_mask(mask, ax, random_color=False):
    if random_color:
        color = np.concatenate([np.random.random(3), np.array([0.6])], axis=0)
    else:
        color = np.array([30 / 255, 144 / 255, 255 / 255, 0.6])
    h, w = mask.shape[-2:]
    mask_image = mask.reshape(h, w, 1) * color.reshape(1, 1, -1)
    ax.imshow(mask_image)


def show_box(box, ax):
    x0, y0 = box[0], box[1]
    w, h = box[2] - box[0], box[3] - box[1]
    ax.add_patch(
        plt.Rectangle((x0, y0), w, h, edgecolor="green", facecolor=(0, 0, 0, 0), lw=2)
    )


def show_boxes_on_image(raw_image, boxes):
    plt.figure(figsize=(10, 10))
    plt.imshow(raw_image)
    for box in boxes:
        show_box(box, plt.gca())
    plt.axis("on")
    plt.show()


def show_points_on_image(raw_image, input_points, input_labels=None):
    plt.figure(figsize=(10, 10))
    plt.imshow(raw_image)
    input_points = np.array(input_points)
    if input_labels is None:
        labels = np.ones_like(input_points[:, 0])
    else:
        labels = np.array(input_labels)
    show_points(input_points, labels, plt.gca())
    plt.axis("on")
    plt.show()


def show_points_and_boxes_on_image(raw_image, boxes, input_points, input_labels=None):
    plt.figure(figsize=(10, 10))
    plt.imshow(raw_image)
    input_points = np.array(input_points)
    if input_labels is None:
        labels = np.ones_like(input_points[:, 0])
    else:
        labels = np.array(input_labels)
    show_points(input_points, labels, plt.gca())
    for box in boxes:
        show_box(box, plt.gca())
    plt.axis("on")
    plt.show()


def show_points(coords, labels, ax, marker_size=375):
    pos_points = coords[labels == 1]
    neg_points = coords[labels == 0]
    ax.scatter(
        pos_points[:, 0],
        pos_points[:, 1],
        color="green",
        marker="*",
        s=marker_size,
        edgecolor="white",
        linewidth=1.25,
    )
    ax.scatter(
        neg_points[:, 0],
        neg_points[:, 1],
        color="red",
        marker="*",
        s=marker_size,
        edgecolor="white",
        linewidth=1.25,
    )


def show_masks_on_image(raw_image, masks, scores):
    if len(masks[0].shape) == 4:
        final_masks = tf.squeeze(masks[0])
    if scores.shape[0] == 1:
        final_scores = tf.squeeze(scores)

    nb_predictions = scores.shape[-1]
    fig, axes = plt.subplots(1, nb_predictions, figsize=(15, 15))

    for i, (mask, score) in enumerate(zip(final_masks, final_scores)):
        mask = tf.stop_gradient(mask)
        axes[i].imshow(np.array(raw_image))
        show_mask(mask, axes[i])
        axes[i].title.set_text(f"Mask {i+1}, Score: {score.numpy().item():.3f}")
        axes[i].axis("off")
    plt.show()
我們將使用點提示來分割汽車圖像。在調用處理器時,請務必將 return_tensors 設定為 tf。
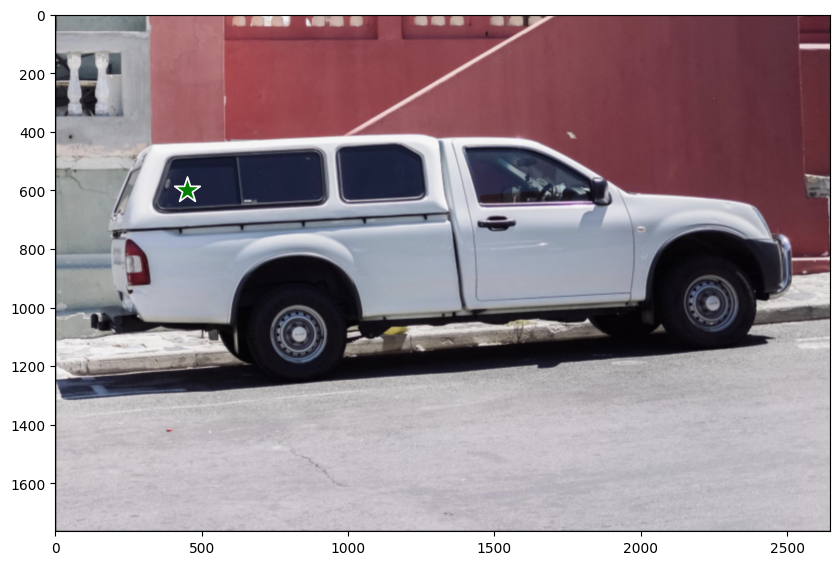
讓我們載入一張汽車圖像並進行分割。
img_url = "https://huggingface.co/ybelkada/segment-anything/resolve/main/assets/car.png"
raw_image = Image.open(requests.get(img_url, stream=True).raw).convert("RGB")
plt.imshow(raw_image)
plt.show()

現在讓我們定義一組將作為提示的點。
input_points = [[[450, 600]]]

# Visualize a single point.
show_points_on_image(raw_image, input_points[0])
並進行分割
# Preprocess the input image.
inputs = processor(raw_image, input_points=input_points, return_tensors="tf")

# Predict for segmentation with the prompt.
outputs = model(**inputs)
outputs 有兩個我們感興趣的屬性
outputs.pred_masks:表示預測的遮罩。outputs.iou_scores:表示與遮罩相關的 IoU 分數。
讓我們後處理遮罩並將它們與其 IoU 分數一起視覺化
masks = processor.image_processor.post_process_masks(
    outputs.pred_masks,
    inputs["original_sizes"],
    inputs["reshaped_input_sizes"],
    return_tensors="tf",
)

show_masks_on_image(raw_image, masks, outputs.iou_scores)
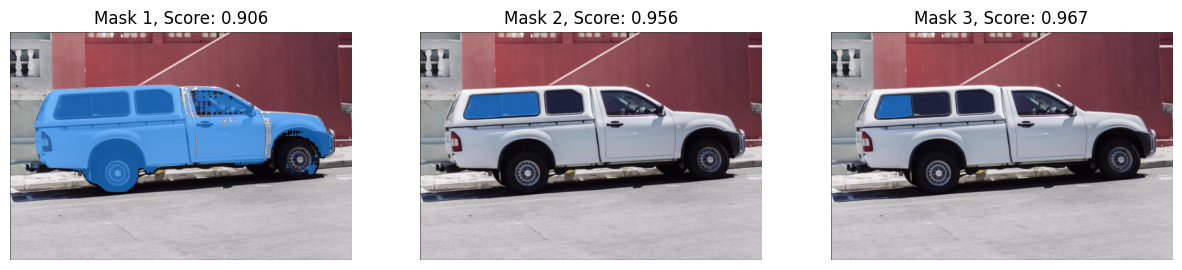
完成了!
如您所見,所有遮罩都是我們提供的點提示的有效遮罩。
SAM 具有足夠的彈性來支援不同的視覺提示,我們鼓勵您查看 這個筆記本,以了解更多相關資訊!
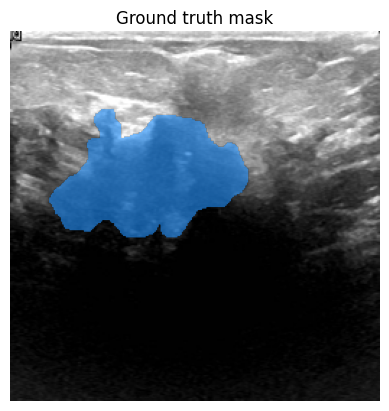
微調
我們將使用 這個資料集,其中包含乳癌掃描影像。在醫療影像領域,能夠分割出包含惡性腫瘤的細胞是一項重要的任務。
資料準備
首先,讓我們取得資料集。
remote_path = "https://hf.co/datasets/sayakpaul/sample-datasets/resolve/main/breast-cancer-dataset.tar.gz"
dataset_path = keras.utils.get_file(
    "breast-cancer-dataset.tar.gz", remote_path, untar=True
)
現在,讓我們視覺化資料集中的一個樣本。
(show_mask() 實用程式取自 這個筆記本)
def show_mask(mask, ax, random_color=False):
    if random_color:
        color = np.concatenate([np.random.random(3), np.array([0.6])], axis=0)
    else:
        color = np.array([30 / 255, 144 / 255, 255 / 255, 0.6])
    h, w = mask.shape[-2:]
    mask_image = mask.reshape(h, w, 1) * color.reshape(1, 1, -1)
    ax.imshow(mask_image)


# Load all the image and label paths.
image_paths = sorted(glob.glob(os.path.join(dataset_path, "images/*.png")))
label_paths = sorted(glob.glob(os.path.join(dataset_path, "labels/*.png")))

# Load the image and label.
idx = 15
image = Image.open(image_paths[idx])
label = Image.open(label_paths[idx])
image = np.array(image)
ground_truth_seg = np.array(label)

# Display.
fig, axes = plt.subplots()
axes.imshow(image)
show_mask(ground_truth_seg, axes)
axes.title.set_text(f"Ground truth mask")
axes.axis("off")
plt.show()

tf.shape(ground_truth_seg)
<tf.Tensor: shape=(2,), dtype=int32, numpy=array([256, 256], dtype=int32)>
準備 tf.data.Dataset
現在,我們編寫一個生成器類別,使用上面使用的 processor 來準備影像和分割遮罩。我們將利用這個生成器類別,透過使用 tf.data.Dataset.from_generator() 為我們的訓練集建立一個 tf.data.Dataset 物件。此類別的實用程式已改編自 這個筆記本。
生成器負責產生預處理的影像和分割遮罩,以及 SAM 模型所需的其他一些中繼資料。
class Generator:
    """Generator class for processing the images and the masks for SAM fine-tuning."""

    def __init__(self, dataset_path, processor):
        self.dataset_path = dataset_path
        self.image_paths = sorted(
            glob.glob(os.path.join(self.dataset_path, "images/*.png"))
        )
        self.label_paths = sorted(
            glob.glob(os.path.join(self.dataset_path, "labels/*.png"))
        )
        self.processor = processor

    def __call__(self):
        for image_path, label_path in zip(self.image_paths, self.label_paths):
            image = np.array(Image.open(image_path))
            ground_truth_mask = np.array(Image.open(label_path))

            # get bounding box prompt
            prompt = self.get_bounding_box(ground_truth_mask)

            # prepare image and prompt for the model
            inputs = self.processor(image, input_boxes=[[prompt]], return_tensors="np")

            # remove batch dimension which the processor adds by default
            inputs = {k: v.squeeze(0) for k, v in inputs.items()}

            # add ground truth segmentation
            inputs["ground_truth_mask"] = ground_truth_mask

            yield inputs

    def get_bounding_box(self, ground_truth_map):
        # get bounding box from mask
        y_indices, x_indices = np.where(ground_truth_map > 0)
        x_min, x_max = np.min(x_indices), np.max(x_indices)
        y_min, y_max = np.min(y_indices), np.max(y_indices)

        # add perturbation to bounding box coordinates
        H, W = ground_truth_map.shape
        x_min = max(0, x_min - np.random.randint(0, 20))
        x_max = min(W, x_max + np.random.randint(0, 20))
        y_min = max(0, y_min - np.random.randint(0, 20))
        y_max = min(H, y_max + np.random.randint(0, 20))
        bbox = [x_min, y_min, x_max, y_max]

        return bbox
get_bounding_box() 負責將真實分割圖轉換為邊界框。這些邊界框在微調期間作為提示(與原始影像一起)饋送到 SAM,然後訓練 SAM 預測有效的遮罩。
首先建立生成器,然後使用它來建立 tf.data.Dataset 的優點在於其彈性。有時,我們可能需要使用其他程式庫的實用程式(例如 albumentations),這些實用程式可能沒有原生 TensorFlow 實作。透過使用此工作流程,我們可以輕鬆地適應這種使用情況。
但是,非 TF 對應項可能會引入效能瓶頸。但是,對於我們的範例,它應該可以正常運作。
現在,我們從訓練集準備 tf.data.Dataset。
# Define the output signature of the generator class.
output_signature = {
    "pixel_values": tf.TensorSpec(shape=(3, None, None), dtype=tf.float32),
    "original_sizes": tf.TensorSpec(shape=(None,), dtype=tf.int64),
    "reshaped_input_sizes": tf.TensorSpec(shape=(None,), dtype=tf.int64),
    "input_boxes": tf.TensorSpec(shape=(None, None), dtype=tf.float64),
    "ground_truth_mask": tf.TensorSpec(shape=(None, None), dtype=tf.int32),
}

# Prepare the dataset object.
train_dataset_gen = Generator(dataset_path, processor)
train_ds = tf.data.Dataset.from_generator(
    train_dataset_gen, output_signature=output_signature
)
接下來,我們配置資料集以獲得效能。
auto = tf.data.AUTOTUNE
batch_size = 2
shuffle_buffer = 4

train_ds = (
    train_ds.cache()
    .shuffle(shuffle_buffer)
    .batch(batch_size)
    .prefetch(buffer_size=auto)
)
取一小批資料並檢查其中元素的形狀。
sample = next(iter(train_ds))
for k in sample:
    print(k, sample[k].shape, sample[k].dtype, isinstance(sample[k], tf.Tensor))
pixel_values (2, 3, 1024, 1024) <dtype: 'float32'> True
original_sizes (2, 2) <dtype: 'int64'> True
reshaped_input_sizes (2, 2) <dtype: 'int64'> True
input_boxes (2, 1, 4) <dtype: 'float64'> True
ground_truth_mask (2, 256, 256) <dtype: 'int32'> True
訓練
我們現在編寫 DICE 損失。此實作基於 MONAI DICE 損失。
def dice_loss(y_true, y_pred, smooth=1e-5):
    y_pred = tf.sigmoid(y_pred)
    reduce_axis = list(range(2, len(y_pred.shape)))
    if batch_size > 1:
        # reducing spatial dimensions and batch
        reduce_axis = [0] + reduce_axis
    intersection = tf.reduce_sum(y_true * y_pred, axis=reduce_axis)
    y_true_sq = tf.math.pow(y_true, 2)
    y_pred_sq = tf.math.pow(y_pred, 2)

    ground_o = tf.reduce_sum(y_true_sq, axis=reduce_axis)
    pred_o = tf.reduce_sum(y_pred_sq, axis=reduce_axis)
    denominator = ground_o + pred_o
    # calculate DICE coefficient
    loss = 1.0 - (2.0 * intersection + 1e-5) / (denominator + 1e-5)
    loss = tf.reduce_mean(loss)

    return loss
微調 SAM
我們現在將微調 SAM 的解碼器部分。我們將凍結視覺編碼器和提示編碼器層。
# initialize SAM model and optimizer
sam = TFSamModel.from_pretrained("facebook/sam-vit-base")
optimizer = keras.optimizers.Adam(1e-5)

for layer in sam.layers:
    if layer.name in ["vision_encoder", "prompt_encoder"]:
        layer.trainable = False


@tf.function
def train_step(inputs):
    with tf.GradientTape() as tape:
        # pass inputs to SAM model
        outputs = sam(
            pixel_values=inputs["pixel_values"],
            input_boxes=inputs["input_boxes"],
            multimask_output=False,
            training=True,
        )

        predicted_masks = tf.squeeze(outputs.pred_masks, 1)
        ground_truth_masks = tf.cast(inputs["ground_truth_mask"], tf.float32)

        # calculate loss over predicted and ground truth masks
        loss = dice_loss(tf.expand_dims(ground_truth_masks, 1), predicted_masks)
        # update trainable variables
        trainable_vars = sam.trainable_variables
        grads = tape.gradient(loss, trainable_vars)
        optimizer.apply_gradients(zip(grads, trainable_vars))

        return loss
All model checkpoint layers were used when initializing TFSamModel.
All the layers of TFSamModel were initialized from the model checkpoint at facebook/sam-vit-base.
If your task is similar to the task the model of the checkpoint was trained on, you can already use TFSamModel for predictions without further training.
WARNING:absl:At this time, the v2.11+ optimizer [`tf.keras.optimizers.Adam`](https://tensorflow.dev.org.tw/api_docs/python/tf/keras/optimizers/Adam) runs slowly on M1/M2 Macs, please use the legacy Keras optimizer instead, located at [`tf.keras.optimizers.legacy.Adam`](https://tensorflow.dev.org.tw/api_docs/python/tf/keras/optimizers/legacy/Adam).
我們現在可以運行三個週期的訓練。我們可能會收到關於遮罩解碼器的 IoU 預測標頭上不存在梯度的警告,我們可以安全地忽略它。
# run training
for epoch in range(3):
    for inputs in train_ds:
        loss = train_step(inputs)
    print(f"Epoch {epoch + 1}: Loss = {loss}")
WARNING:tensorflow:Gradients do not exist for variables ['tf_sam_model_1/mask_decoder/iou_prediction_head/proj_in/kernel:0', 'tf_sam_model_1/mask_decoder/iou_prediction_head/proj_in/bias:0', 'tf_sam_model_1/mask_decoder/iou_prediction_head/proj_out/kernel:0', 'tf_sam_model_1/mask_decoder/iou_prediction_head/proj_out/bias:0', 'tf_sam_model_1/mask_decoder/iou_prediction_head/layers_._0/kernel:0', 'tf_sam_model_1/mask_decoder/iou_prediction_head/layers_._0/bias:0'] when minimizing the loss. If you're using `model.compile()`, did you forget to provide a `loss` argument?

WARNING:tensorflow:Gradients do not exist for variables ['tf_sam_model_1/mask_decoder/iou_prediction_head/proj_in/kernel:0', 'tf_sam_model_1/mask_decoder/iou_prediction_head/proj_in/bias:0', 'tf_sam_model_1/mask_decoder/iou_prediction_head/proj_out/kernel:0', 'tf_sam_model_1/mask_decoder/iou_prediction_head/proj_out/bias:0', 'tf_sam_model_1/mask_decoder/iou_prediction_head/layers_._0/kernel:0', 'tf_sam_model_1/mask_decoder/iou_prediction_head/layers_._0/bias:0'] when minimizing the loss. If you're using `model.compile()`, did you forget to provide a `loss` argument?

WARNING:tensorflow:Gradients do not exist for variables ['tf_sam_model_1/mask_decoder/iou_prediction_head/proj_in/kernel:0', 'tf_sam_model_1/mask_decoder/iou_prediction_head/proj_in/bias:0', 'tf_sam_model_1/mask_decoder/iou_prediction_head/proj_out/kernel:0', 'tf_sam_model_1/mask_decoder/iou_prediction_head/proj_out/bias:0', 'tf_sam_model_1/mask_decoder/iou_prediction_head/layers_._0/kernel:0', 'tf_sam_model_1/mask_decoder/iou_prediction_head/layers_._0/bias:0'] when minimizing the loss. If you're using `model.compile()`, did you forget to provide a `loss` argument?

WARNING:tensorflow:Gradients do not exist for variables ['tf_sam_model_1/mask_decoder/iou_prediction_head/proj_in/kernel:0', 'tf_sam_model_1/mask_decoder/iou_prediction_head/proj_in/bias:0', 'tf_sam_model_1/mask_decoder/iou_prediction_head/proj_out/kernel:0', 'tf_sam_model_1/mask_decoder/iou_prediction_head/proj_out/bias:0', 'tf_sam_model_1/mask_decoder/iou_prediction_head/layers_._0/kernel:0', 'tf_sam_model_1/mask_decoder/iou_prediction_head/layers_._0/bias:0'] when minimizing the loss. If you're using `model.compile()`, did you forget to provide a `loss` argument?

WARNING:tensorflow:Gradients do not exist for variables ['tf_sam_model_1/mask_decoder/iou_prediction_head/proj_in/kernel:0', 'tf_sam_model_1/mask_decoder/iou_prediction_head/proj_in/bias:0', 'tf_sam_model_1/mask_decoder/iou_prediction_head/proj_out/kernel:0', 'tf_sam_model_1/mask_decoder/iou_prediction_head/proj_out/bias:0', 'tf_sam_model_1/mask_decoder/iou_prediction_head/layers_._0/kernel:0', 'tf_sam_model_1/mask_decoder/iou_prediction_head/layers_._0/bias:0'] when minimizing the loss. If you're using `model.compile()`, did you forget to provide a `loss` argument?

WARNING:tensorflow:Gradients do not exist for variables ['tf_sam_model_1/mask_decoder/iou_prediction_head/proj_in/kernel:0', 'tf_sam_model_1/mask_decoder/iou_prediction_head/proj_in/bias:0', 'tf_sam_model_1/mask_decoder/iou_prediction_head/proj_out/kernel:0', 'tf_sam_model_1/mask_decoder/iou_prediction_head/proj_out/bias:0', 'tf_sam_model_1/mask_decoder/iou_prediction_head/layers_._0/kernel:0', 'tf_sam_model_1/mask_decoder/iou_prediction_head/layers_._0/bias:0'] when minimizing the loss. If you're using `model.compile()`, did you forget to provide a `loss` argument?

WARNING:tensorflow:Gradients do not exist for variables ['tf_sam_model_1/mask_decoder/iou_prediction_head/proj_in/kernel:0', 'tf_sam_model_1/mask_decoder/iou_prediction_head/proj_in/bias:0', 'tf_sam_model_1/mask_decoder/iou_prediction_head/proj_out/kernel:0', 'tf_sam_model_1/mask_decoder/iou_prediction_head/proj_out/bias:0', 'tf_sam_model_1/mask_decoder/iou_prediction_head/layers_._0/kernel:0', 'tf_sam_model_1/mask_decoder/iou_prediction_head/layers_._0/bias:0'] when minimizing the loss. If you're using `model.compile()`, did you forget to provide a `loss` argument?

WARNING:tensorflow:Gradients do not exist for variables ['tf_sam_model_1/mask_decoder/iou_prediction_head/proj_in/kernel:0', 'tf_sam_model_1/mask_decoder/iou_prediction_head/proj_in/bias:0', 'tf_sam_model_1/mask_decoder/iou_prediction_head/proj_out/kernel:0', 'tf_sam_model_1/mask_decoder/iou_prediction_head/proj_out/bias:0', 'tf_sam_model_1/mask_decoder/iou_prediction_head/layers_._0/kernel:0', 'tf_sam_model_1/mask_decoder/iou_prediction_head/layers_._0/bias:0'] when minimizing the loss. If you're using `model.compile()`, did you forget to provide a `loss` argument?

Epoch 1: Loss = 0.08322787284851074
Epoch 2: Loss = 0.05677264928817749
Epoch 3: Loss = 0.07764029502868652
序列化模型
我們將模型序列化並將其推送給您,如下所示。push_to_hub 方法會序列化模型、產生模型卡並將其推送到 Hugging Face Hub,以便其他人可以使用 from_pretrained 方法載入模型以進行推論或進一步微調。我們還需要將相同的預處理器推送到儲存庫中。請在此處尋找模型和預處理器。
# sam.push_to_hub("merve/sam-finetuned")
# processor.push_to_hub("merve/sam-finetuned")
我們現在可以使用模型進行推論。
# Load another image for inference.
idx = 20
raw_image_inference = Image.open(image_paths[idx])

# process the image and infer
preprocessed_img = processor(raw_image_inference)
outputs = sam(preprocessed_img)
最後,我們可以視覺化結果。
infer_masks = outputs["pred_masks"]
iou_scores = outputs["iou_scores"]
show_masks_on_image(raw_image_inference, masks=infer_masks, scores=iou_scores)
WARNING:matplotlib.image:Clipping input data to the valid range for imshow with RGB data ([0..1] for floats or [0..255] for integers).
WARNING:matplotlib.image:Clipping input data to the valid range for imshow with RGB data ([0..1] for floats or [0..255] for integers).
WARNING:matplotlib.image:Clipping input data to the valid range for imshow with RGB data ([0..1] for floats or [0..255] for integers).
